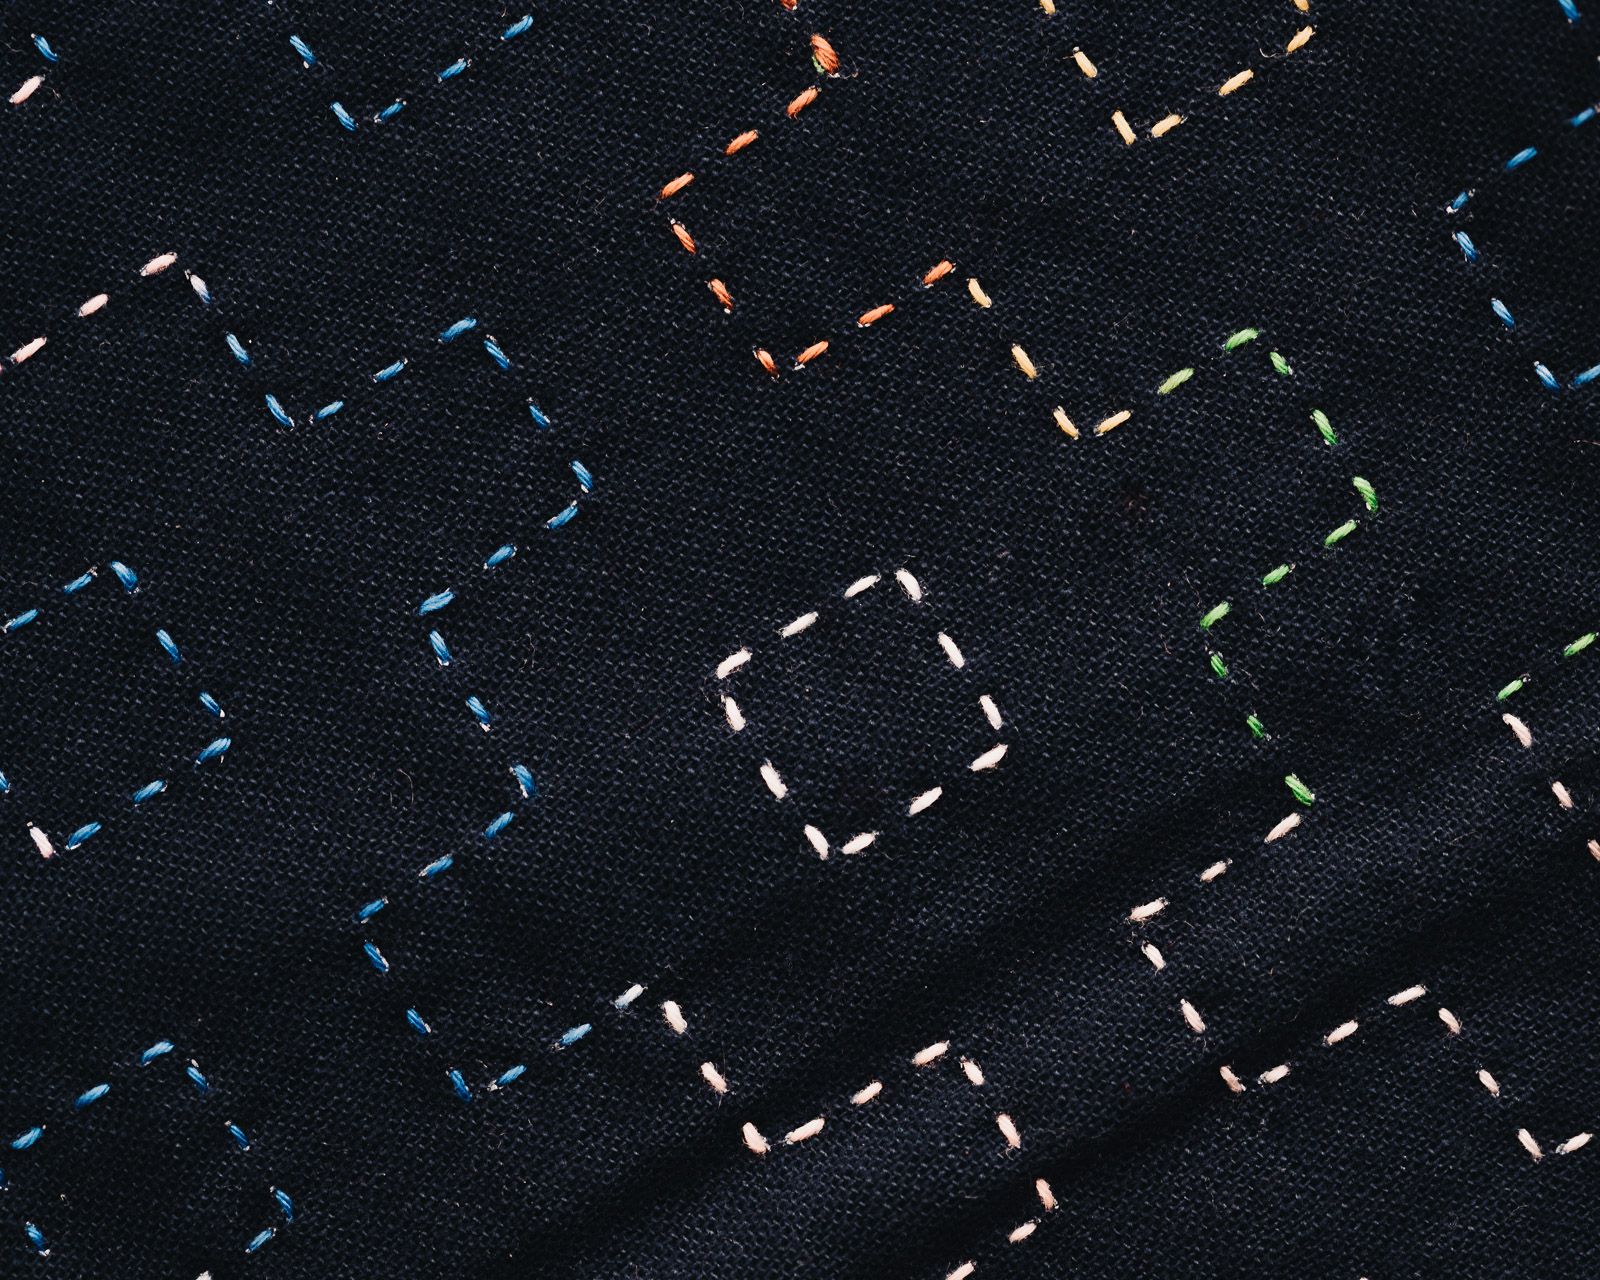
If you reduce sashiko to its technique, it is basically a running stitch that creates patterns. So of course you can use it to quilt. | What you need to know
Table of Contents
Why should you quilt with sashiko?
Can you quilt with sashiko?
If you reduce sashiko to its technique, it is basically a running stitch that creates patterns. So of course you can use sashiko to quilt.
Sashiko is a traditional Japanese stitching technique with a rich cultural heritage and a long history. It would be wrong to define it as a mere running stitch and strip away its deeper meaning and its tradition. But if you just want to know whether the technique can be used for quilting, the answer is a clear: yes!
If done properly, sashiko is very fast, easy on the fingers, and extremely durable.
I put together a couple of tips to help you create your first sashiko quilt without any difficulties. Recommendations for materials are at the bottom.
Stitches on the Run is reader-supported. When you buy through links on my site, I may earn an affiliate commission. It doesn't cost you anything extra but it helps keep my blog and my stitches running. Thanks!
Why should you quilt with sashiko?
Quilting and sashiko are two beloved textile arts that have been practiced for centuries. Quilting has its roots in early American history and is known for its warmth and comfort, while sashiko originated in Japan and is prized for its intricate, decorative patterns.
Combining these two traditions creates something unique that is both modern and traditional. Depending on the materials you use, sashiko quilts can be extremely long lasting and eco friendly, which also befits our modern times.
I love sashiko quilts because of their look, their feel and the meaning that I weave into every single stitch I make. My quilts are supposed to keep my loved ones warm, happy and safe from harm. Just like all traditional sashiko is.
Let me explain how you can combine these two traditions into a unique keepsake that is fun to create:
5 different styles for quilting with sashiko
Depending on which style you are going for, the best way to proceed will be different. Let's take a quick look at the most important differences between the 5 different options.
- Make a quilt from scratch with sashiko – most rewarding
- Only do sashiko on the top layer – easy but wasted
- Combine smaller sashiko pieces to a big quilt – portable
- Add sashiko-style accents to a pre-existing quilt – easiest for beginners
- Mend a quilt using sashiko – recommended if you get a chance
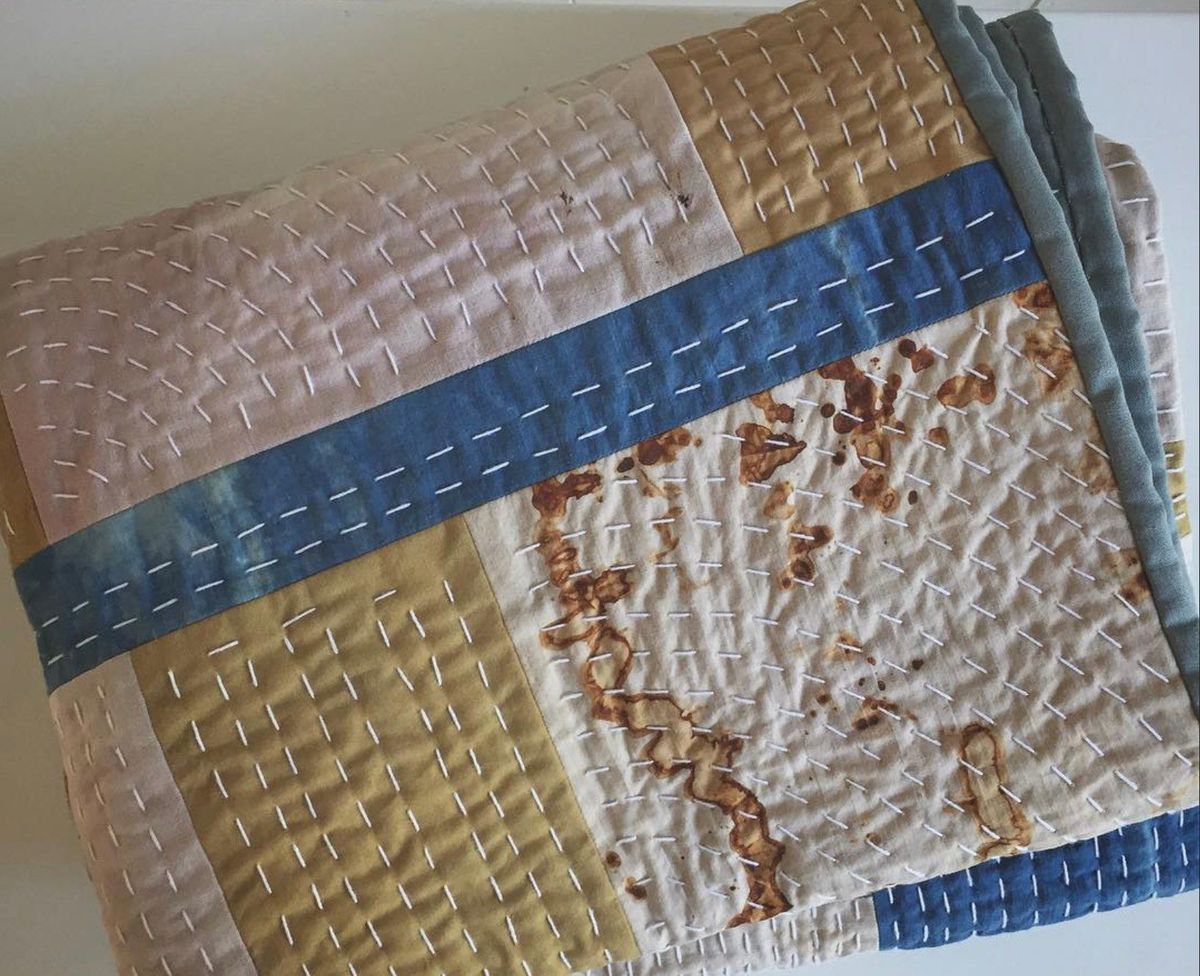
Making a quilt from scratch – the real deal!
Depending on the materials you choose, this quilt is the real deal. Especially if you only use cotton or linen fabric for your batting, your finished quilt will feel like blankets that were used in Japan decades ago. Even with thin batting, sashiko stitches create a lovely rich texture that is soft to the touch.
This quilt can be easily washed and will last forever. If it develops a hole after years of heavy usage, it can be mended with sashiko and look all the better for it.
If you want to make an heirloom that is timeless, I strongly recommend making a sashiko quilt this way.
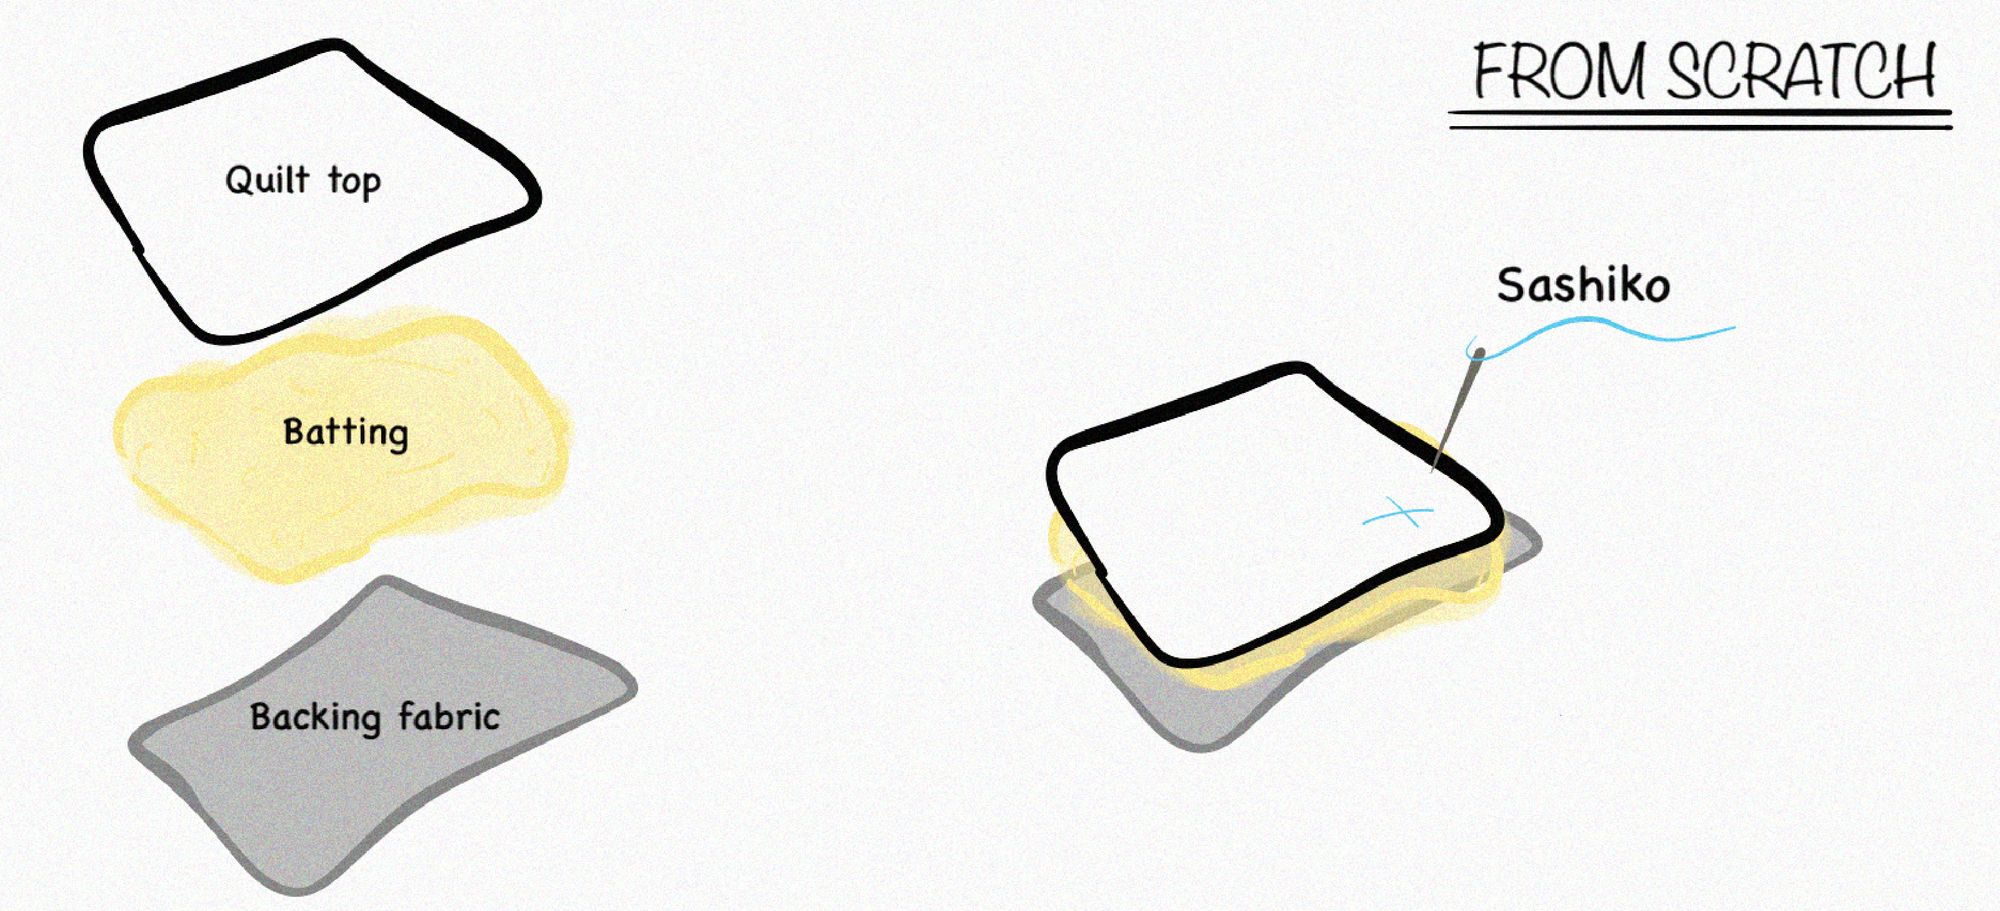
What you need for the quilt:
- quilt top
- batting
- backing fabric
- binding (you can get away without binding)
How to proceed:
Your quilt top can consist of one large fabric panel the size you want your quilt to be or you can sew several fabric panels or scraps together to create one large panel.
Transfer your sashiko design or some removable guidelines to the right side of your quilt top if you want to achieve an even design.
Create your quilt sandwich by layering your backing fabric (right side facing down), your batting, and finally your quilt top, right side facing up.
Baste your layers together. Don't skip this step unless your quilt is really small or you're some kind of quilting goddess or god.
Start in the middle and alternate a small stitch with a long stitch to make sure everything stays in place but doesn't take forever.
Now you are ready to add your sashiko stitches. The more complex the design, the more your layers may shift around despite the basting. Take your time and smooth out your stitches regularly for an even design. Make sure that your stitches go through all three layers. The bulkier your batting, the more difficult this will be. Try to pierce the fabric layers at a 90° angle to avoid puckering.
Add your binding if you want a clean finish and admire your beautiful quilt.
Invite some friends over to admire the quilt with you.
Share your result by tagging #stitchesontherun so I can admire your quilt, too.
Top layer only
As you are not stitching through several layers, even intricate sashiko designs are easy to apply. Sadly, you will miss out on the extremely beautiful texture that results from doing sashiko through numerous layers.
On the upside, you can choose the batting freely. No restrictions. If your machine is up to it, go for it!
The characteristics will depend on the materials you use, just like with any normal quilt.
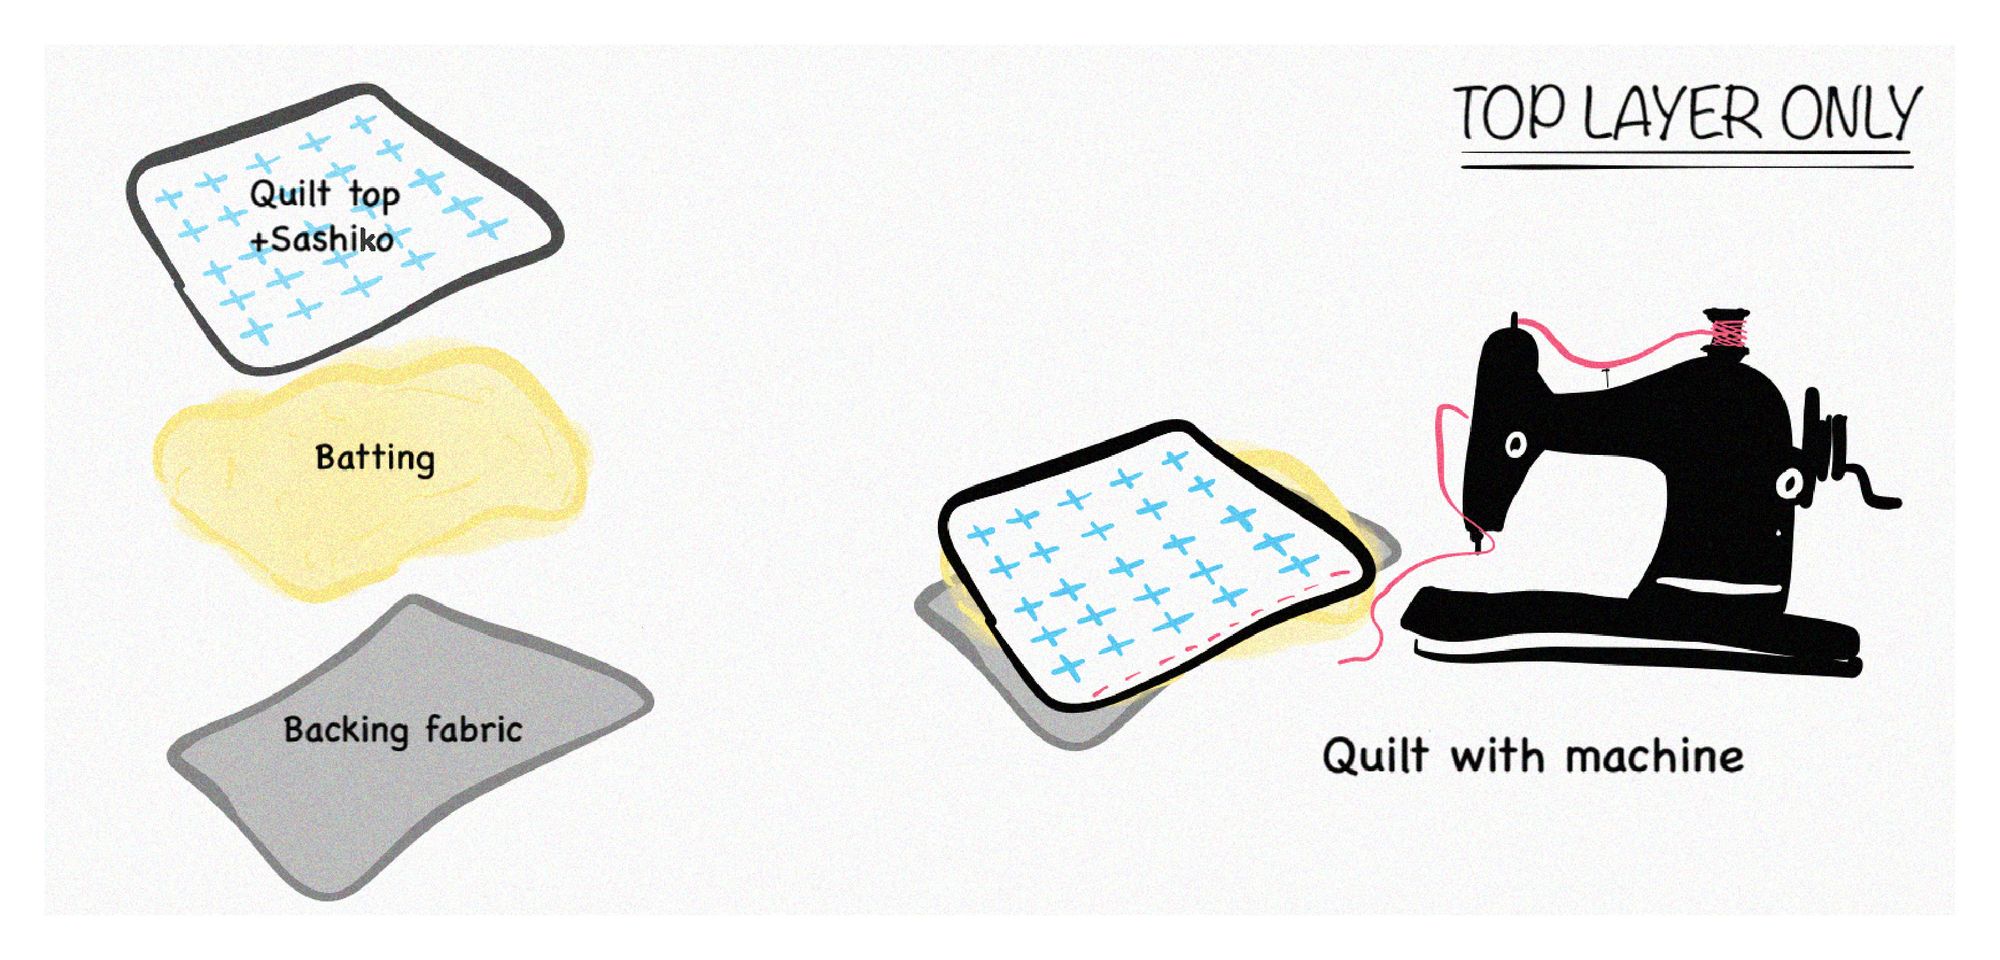
What you need for the quilt:
- quilt top
- batting
- backing fabric
- binding
How to proceed:
Your quilt top can consist of one large fabric panel the size you want your quilt to be or you can sew several fabric panels or scraps together to create one large panel.
Transfer your sashiko design or some removable guidelines to the right side of your quilt top if you want to achieve an even design.
Add your sashiko stitches. This should be rather easy as you are working on one layer only. Still, smoothing out your stitches regularly is important to avoid puckering.
Create your quilt sandwich by layering your backing fabric (right side facing down), your batting, and finally your quilt top, right side facing up.
Baste your layers together. Or don't. But don't blame me if your result is a puckering mess.
Start in the middle and alternate a small stitch with a long stitch to make sure everything stays in place but is finished quickly.
Quilt your layers together with the help of a sewing machine.
Remove the basting.
Add your binding and take a break while admiring your quilt.
Invite some friends over to admire the quilt with you.
Let me admire the quilt, too, by tagging a photo of your quilt with #stitchesontherun.
Small pieces to big quilt
This method is perfect if you often stitch on the run like I do.
Your outcome will be similar to the top-layer-only quilt above, meaning you'll miss out on some of the texture, but if you only have five or ten minutes here and there while out and about, this quilt is a valid option to still incorporate lots of sashiko into your quilt.
Making your quilt from scraps will give it a somewhat boro feel, especially if you use indigo fabric scraps or other mellow natural dye colors.
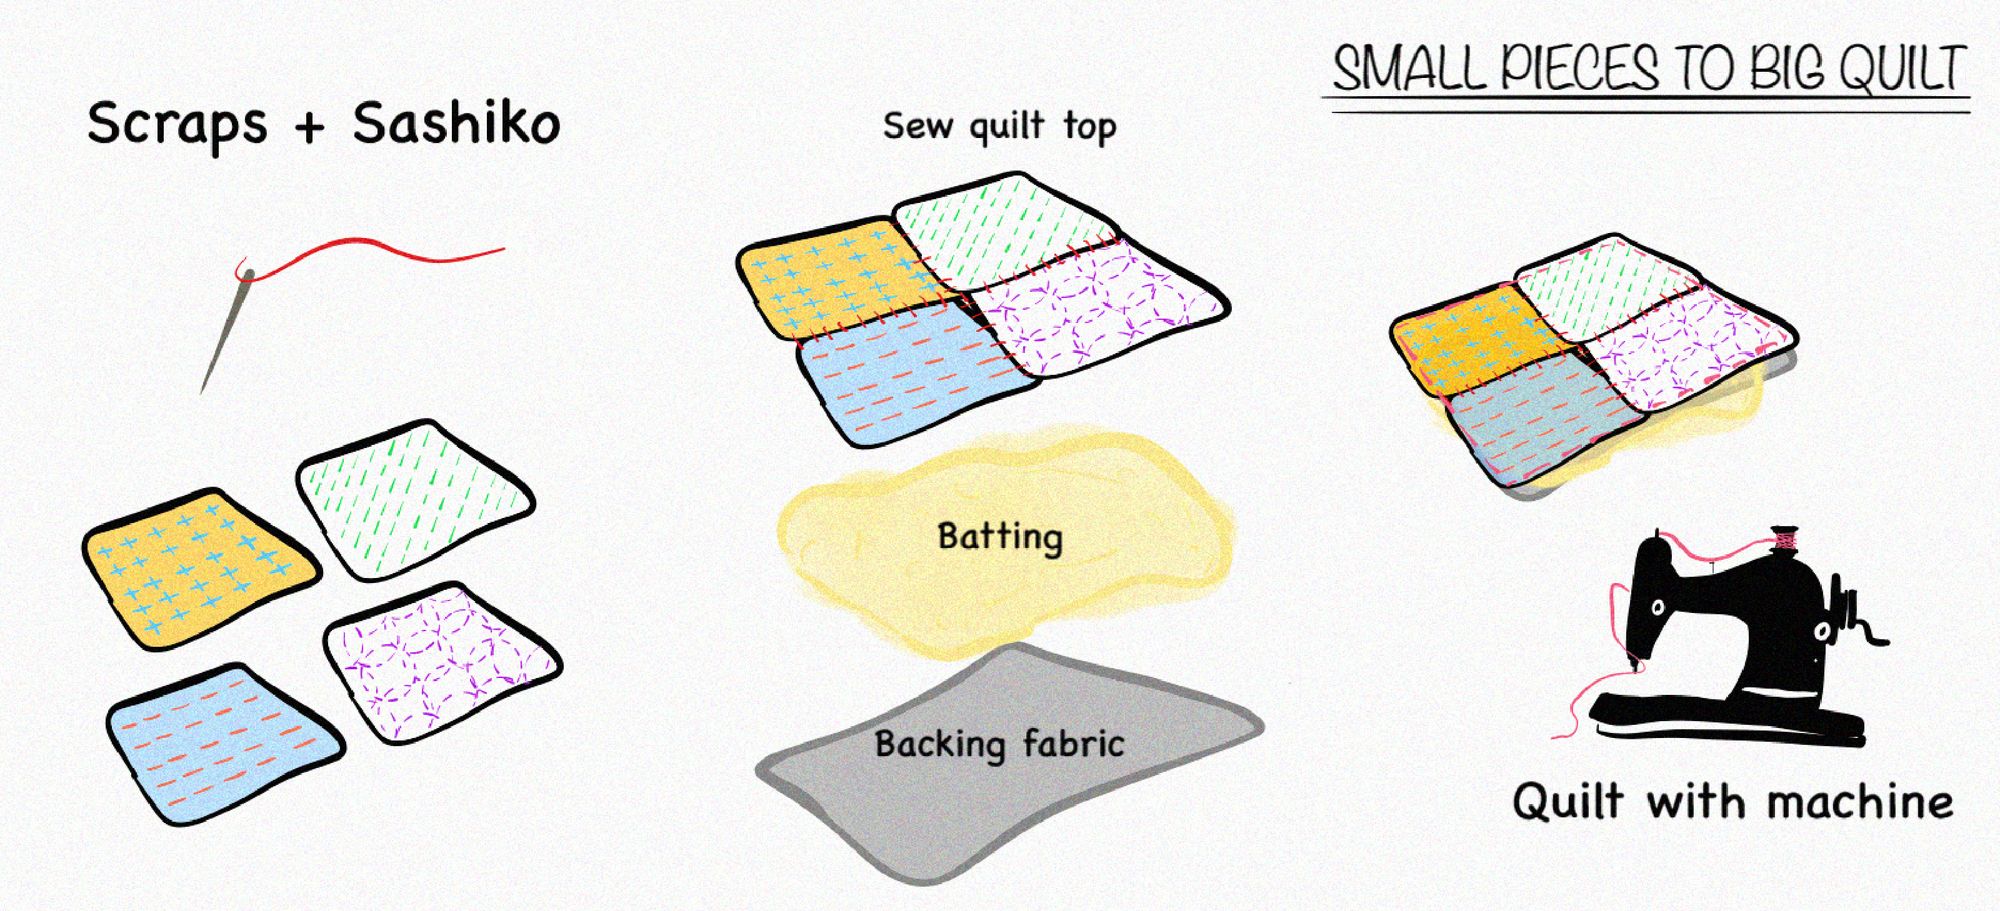
What you need for the quilt:
- many fabric scraps to create your quilt top
- batting
- backing fabric
- binding
How to proceed:
Your quilt top consists of many fabric panels or scraps that you piece together.
Transfer your sashiko design or some removable guidelines to the right side of fabric scraps for easier stitching or just go freehand.
I prefer to stitch along lines, but not everyone does. It's up to you.
Add your sashiko stitches. This should be rather easy as you are working on one layer only. Even if you are working on a single layer, smoothing out your stitches regularly is important to avoid puckering.
It is not necessary to put sashiko on all the different panels, just decide what kind of balance you like and plan accordingly.
Join all the sashikoed fabric pieces together into one large panel the size you want your quilt to be.
Create your quilt sandwich by layering your backing fabric (right side facing down), your batting, and finally your quilt top, right side facing up.
Baste your layers together. Don't skip this step unless your quilt is really small or you just love puckering and can't be bothered.
Start in the middle and alternate a small stitch with a very long stitch to make sure everything stays in place but is easy to remove afterward.
Quilt your layers together with the help of a sewing machine or by hand and remove the basting.
Take a break, eat some cake, and admire your one-of-a-kind quilt. It doesn't get much more one-of-a-kind than this!
Invite some friends over to share your cake and your joy. Don't forget to celebrate your and your quilt's uniqueness.
Adding accents
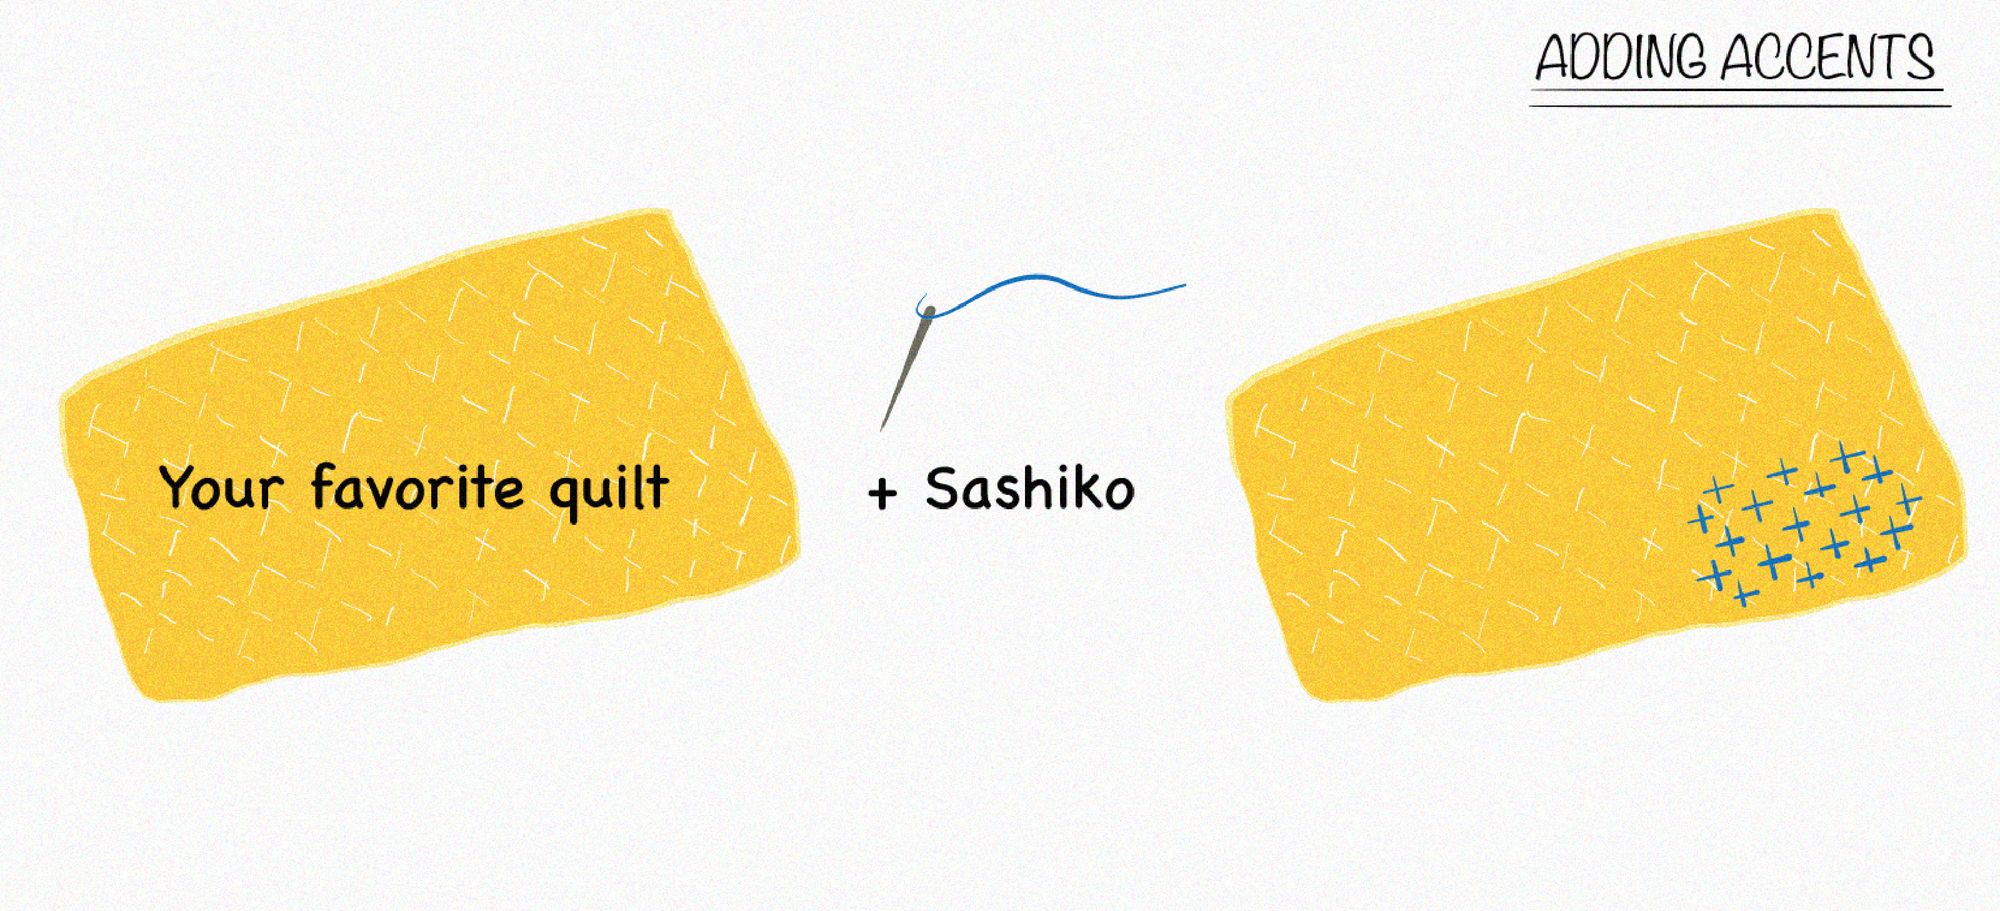
So you have a favorite quilt but you wish it had some cool sashiko on it? Don't fret, get out your needle and put on a smile: It's super easy to add some sashiko to an existing quilt.
What you need for the quilt:
- a finished quilt
Okay, that sounds weird. And of course, you still need an idea for a sashiko design, a needle, and some thread. A palm thimble is of great help and scissors are more or less a requirement. And you probably want to transfer your design with some tool or another.
How to proceed:
Choose where you want your design to be and draw some lines that you can follow or simply draw a grid that you can use as a guideline.
I recommend using a marker that vanishes with heat, so you don't have to wash your quilt to get rid of any markings.
Go through all layers when you stitch for the most traditional look.
The characteristics of your quilt will be more or less the same as those of your original quilt with some added strength and texture.
How your quilt will change exactly depends on how many stitches you add.
The more stitches you add, the more strength and texture will be added. Keep that in mind when you decide on your design.
And of course, the more complex the design is, the longer your project will take to finish.
Sashiko mending
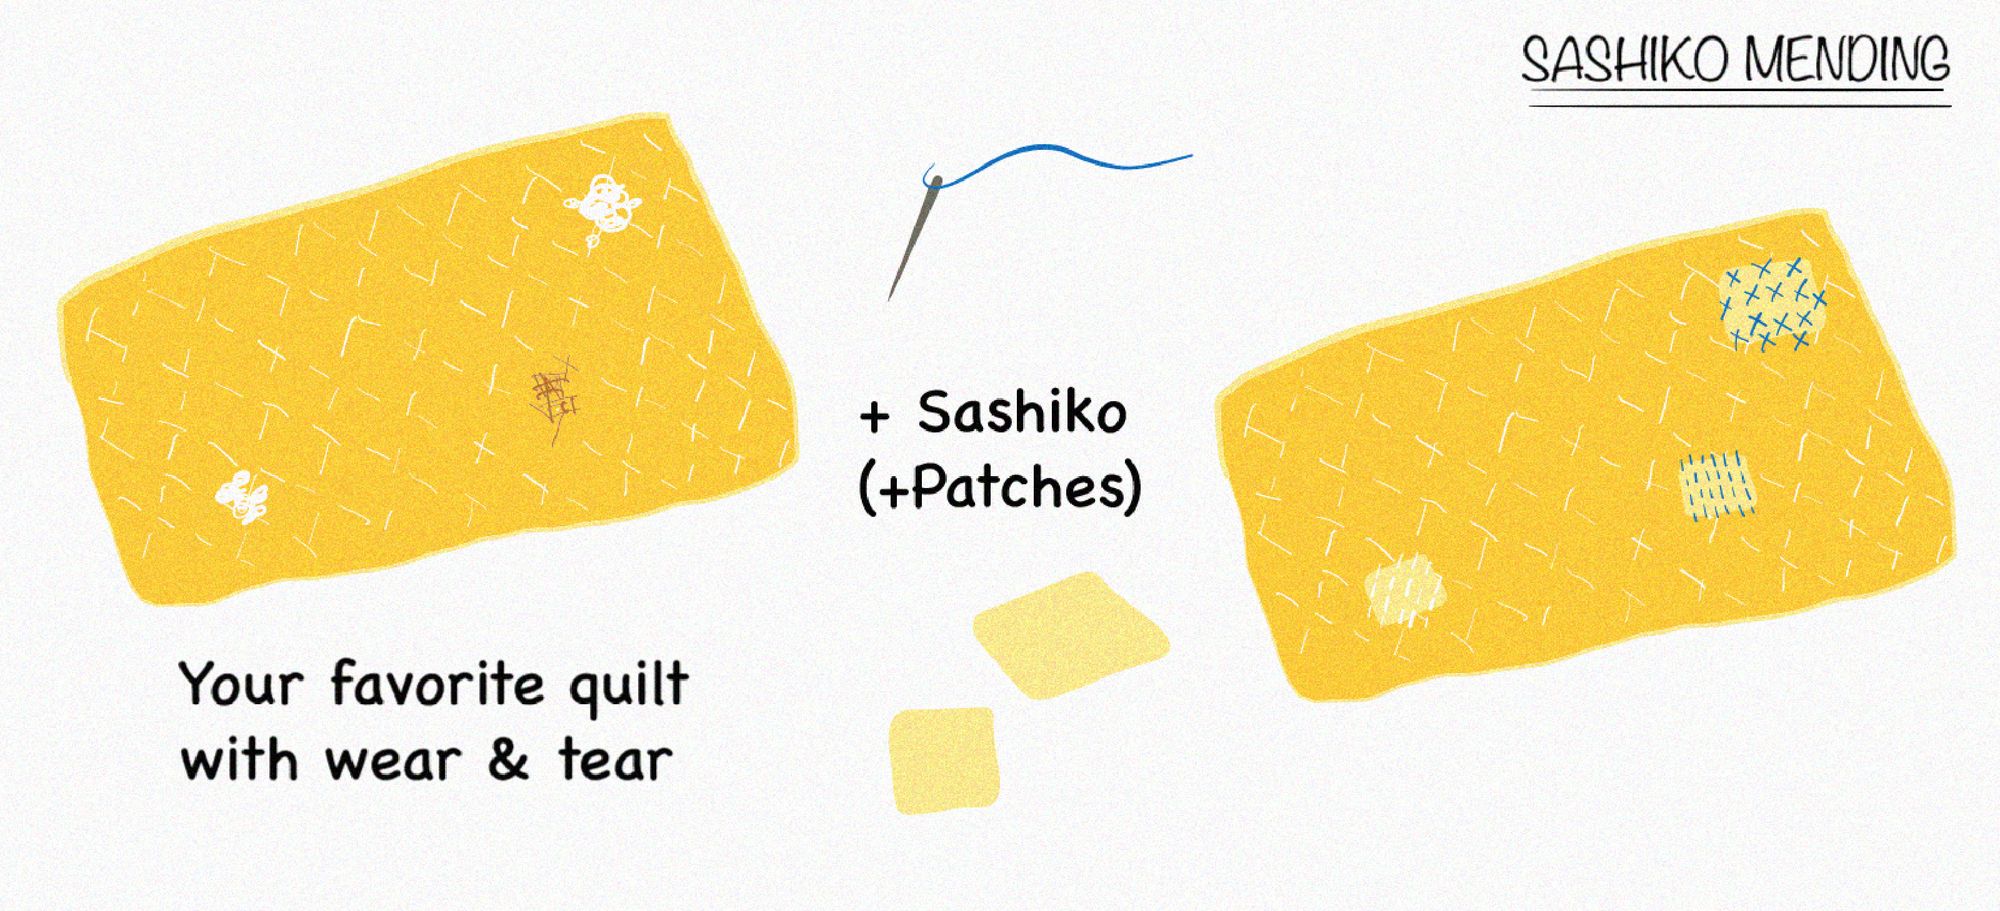
- a finished quilt with some wear or even a couple of holes
How to proceed:
Same as above, choose where you want your design to be and draw some lines that you can follow, or simply draw a grid that you can use as a guideline.
I recommend using a marker that vanishes with heat, so you don't have to wash your quilt to get rid of any markings.
To add strength, simply stitch over all the places that have worn thin.
To mend holes, add some patches on both sides of your quilt and simply stitch over them. If you extend your stitches beyond the patches, the design looks more deliberate and less patched up.
Make sure to go through all layers when you stitch on patches.
The characteristics of your quilt will be more or less the same as those of your original quilt with some added strength and texture.
The more stitches you add, the more strength and texture you will get. If you want your quilt to be comfy, don't overdo it!
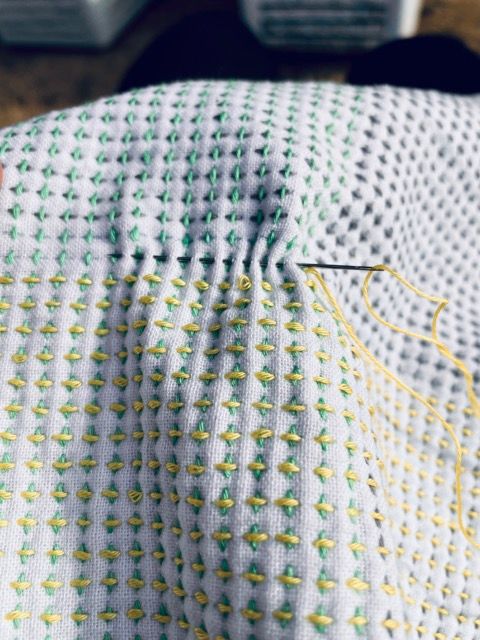
Difficulties
Puckering
As mentioned above, if you aren't careful, your fabric may pucker. To avoid puckering I really encourage you to baste your project. Start in the middle and work your way to the outer edges to achieve the best result.
I usually baste with thread and needle, but pins work fine, too.
Tension
When you do sashiko, leave some slack on the wrong side of the fabric when you turn corners. It is necessary if you want the corners to look clean.
With multiple washing cycles, sashiko thread may shrink and cause unnecessary puckering.
Breaking needles
When you use batting, even sturdy sashiko needles may break. In this case, switching to a quilting needle may help. Quilting needles are not as long as sashiko needles, so you can't load as many stitches, but they don't break because they are bendier than sashiko needles.
Stitching through three or even four layers of linen cloth is no big deal for a good sashiko needle. Add batting and you may end up breaking a needle or two.
Try out which needle is best suited for your quilting task. Just make sure you don't hurt yourself in the process.
If you do break a needle, there is a ceremony in Japan for broken needles. It's called harikuyō. Let me know if you are interested in more details!
Guiding lines gone
If you are quilting a larger project, you will probably go over any markings several times. Especially if you go for a design with many stitches close together, your markings may rub off if you draw them using chalk-based pencils.
I recommend markers that vanish if you apply heat, so you don't have to re-apply your markings.(Sadly these are mostly sold out. I still think they're the best, though.)
Also, they are easy to redo if you make a mistake and you don't have to wash your quilt after finishing it. You can simply iron the markings out.
The markers don't work on dark fabric, so you'll have to resolve to chalk pencils or chaco paper and maybe redo the lines if they vanish before you've finished the project.
Experience
If you have never done sashiko before, I recommend getting familiar with the technique on a simpler project like a table runner or a kitchen cloth.
These pre-printed patterns are a great way to get in some practice:
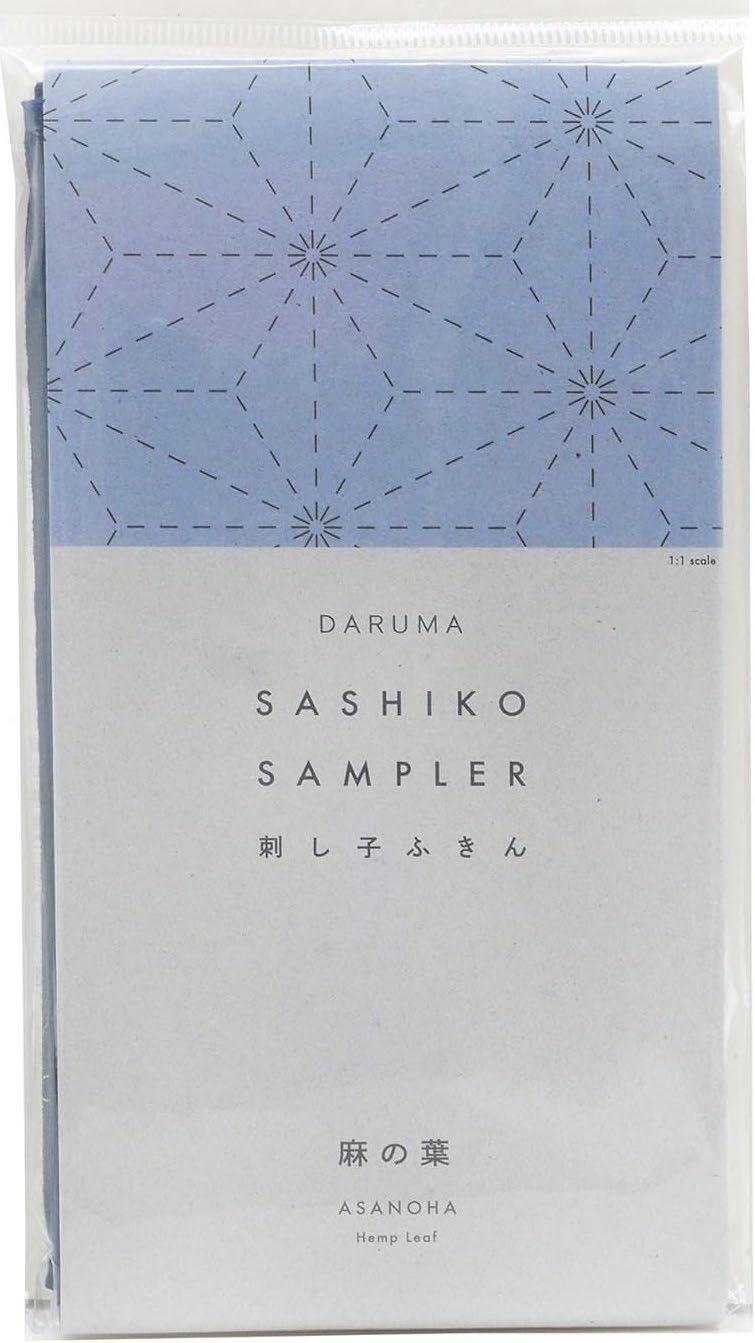
Pre-printed fabric by Daruma
If you want to do sashiko, but you don't want the hassle of drawing the pattern yourself, Daruma offers fabric that has the pattern printed on it, but the lines wash out when you've finished stitching. Super easy!
If you do sashiko with the right technique, it is super fast. If you don't use the sashiko technique for a sashiko design, it will take at least twice as long to finish it. And with big projects like a quilt, that's a massive difference!
Make sure you make use of a palm thimble and load several stitches at once onto your needle. Even if it may feel awkward at first. But once you get the hang of it, the technique is very easy and, well, super fast.
Knots
Don't use knots, just backstitch a couple of stitches to make sure your stitches don't come undone. Especially if you use lighter fabrics, backstitching delivers a more beautiful finish.
If you use sashiko thread, backstitching 3-4 stitches are enough.
If you feel more comfortable using knots, you can hide them in between the different layers to make them invisible.
Make a tiny sample
Even though it may seem tedious and the result may be a little different if you size down, I suggest you create a smaller version of your quilt first.
This way you can be sure that the materials you use work well together. It is very unnerving to prepare everything for your project only to find out that it's super hard to stitch!
On top of that, you can test if the feel and the texture of the sample are what you want from a quilt. If not, you can easily adapt the materials or the stitching pattern.
Patterns
Patterns that are easy for beginners
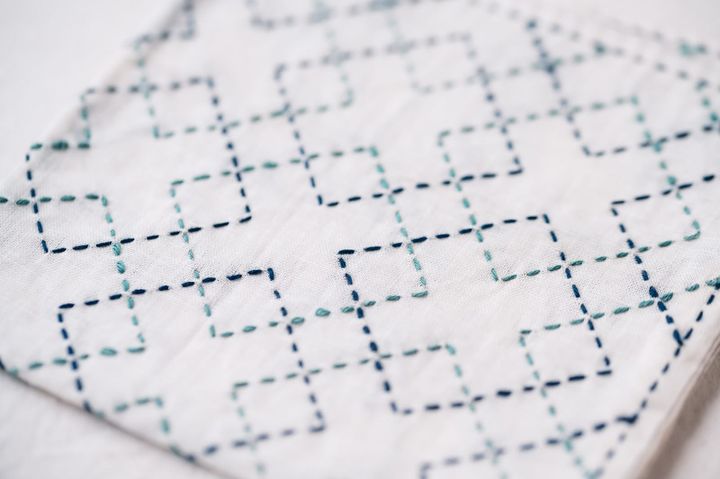
The easiest pattern for a beginner is undoubtedly a simple running stitch sewn along a line. Even though it is very simple, it looks very beautiful and adds a great amount of texture.
If you want to take your design one step further, you can do jūjizashi. This pattern forms many tiny crosses and adds even more texture.
You stitch the horizontal lines first and then go over your stitches at a 90-degree angle after you've finished all horizontal stitches.
This means you can always try the simple running stitch first and decide afterward whether you want to take the design any further.
Patterns that are great for quilting
If you do sashiko, any pattern is a great choice for quilting. No really! You can't go wrong here.
Patterns that add a lot of texture
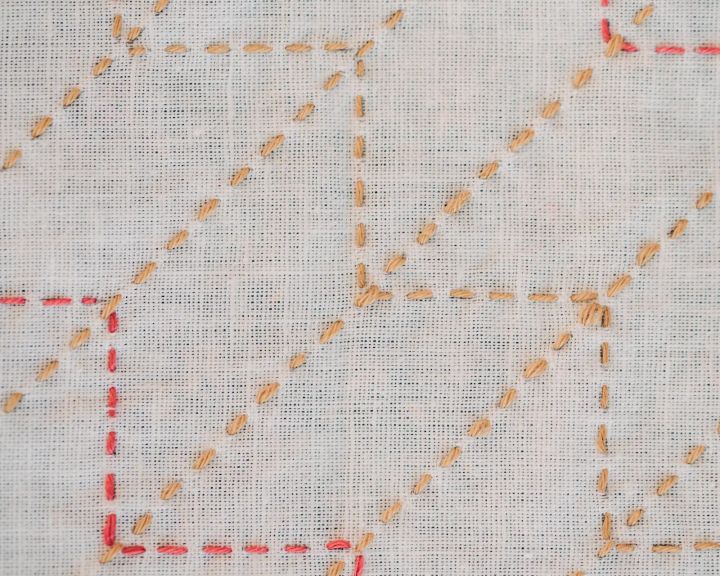
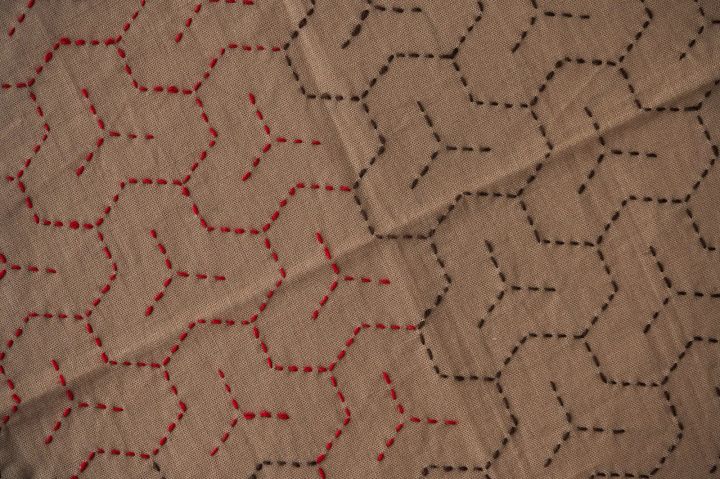
If you are a texture fan like me, I recommend you try hitomezashi for quilting. The patterns are designed along a grid, which makes them easy to draw and the stitching process is very calming.
You can easily switch up any hitomezashi patterns and achieve a consistent look in your quilt. They go together really great and if you get bored with a pattern, you can change the design instantly without having to adjust your markings.
If you need some inspiration, you can find my library of sashiko patterns here.
Materials
Fabric
Any fabric that works for a traditional quilt will work for a sashiko quilt, too. That being said, a fabric with a somewhat looser weave will make your task easier. When you stitch through several layers, the resistance adds up, so working with a fabric that is easy on your needle, you'll not regret it.
My favorite fabric for quilting is cotton fabric. Cotton fabric is cheap, readily available everywhere, and ages well. It also feels nice on your skin and I love a comfy quilt!
Thread
You can use cotton perl or other thread, but I recommend sashiko thread. Same as with the fabric, sashiko thread is comfy and ages well. It's also extremely durable. The only downside I can come up with is that it is more expensive than embroidery thread. But a good quilt is definitely worth the investment.
Find out more about sashiko thread.
Needles
The perfect needle depends on many factors like your hand size, your stitching technique, the thread...
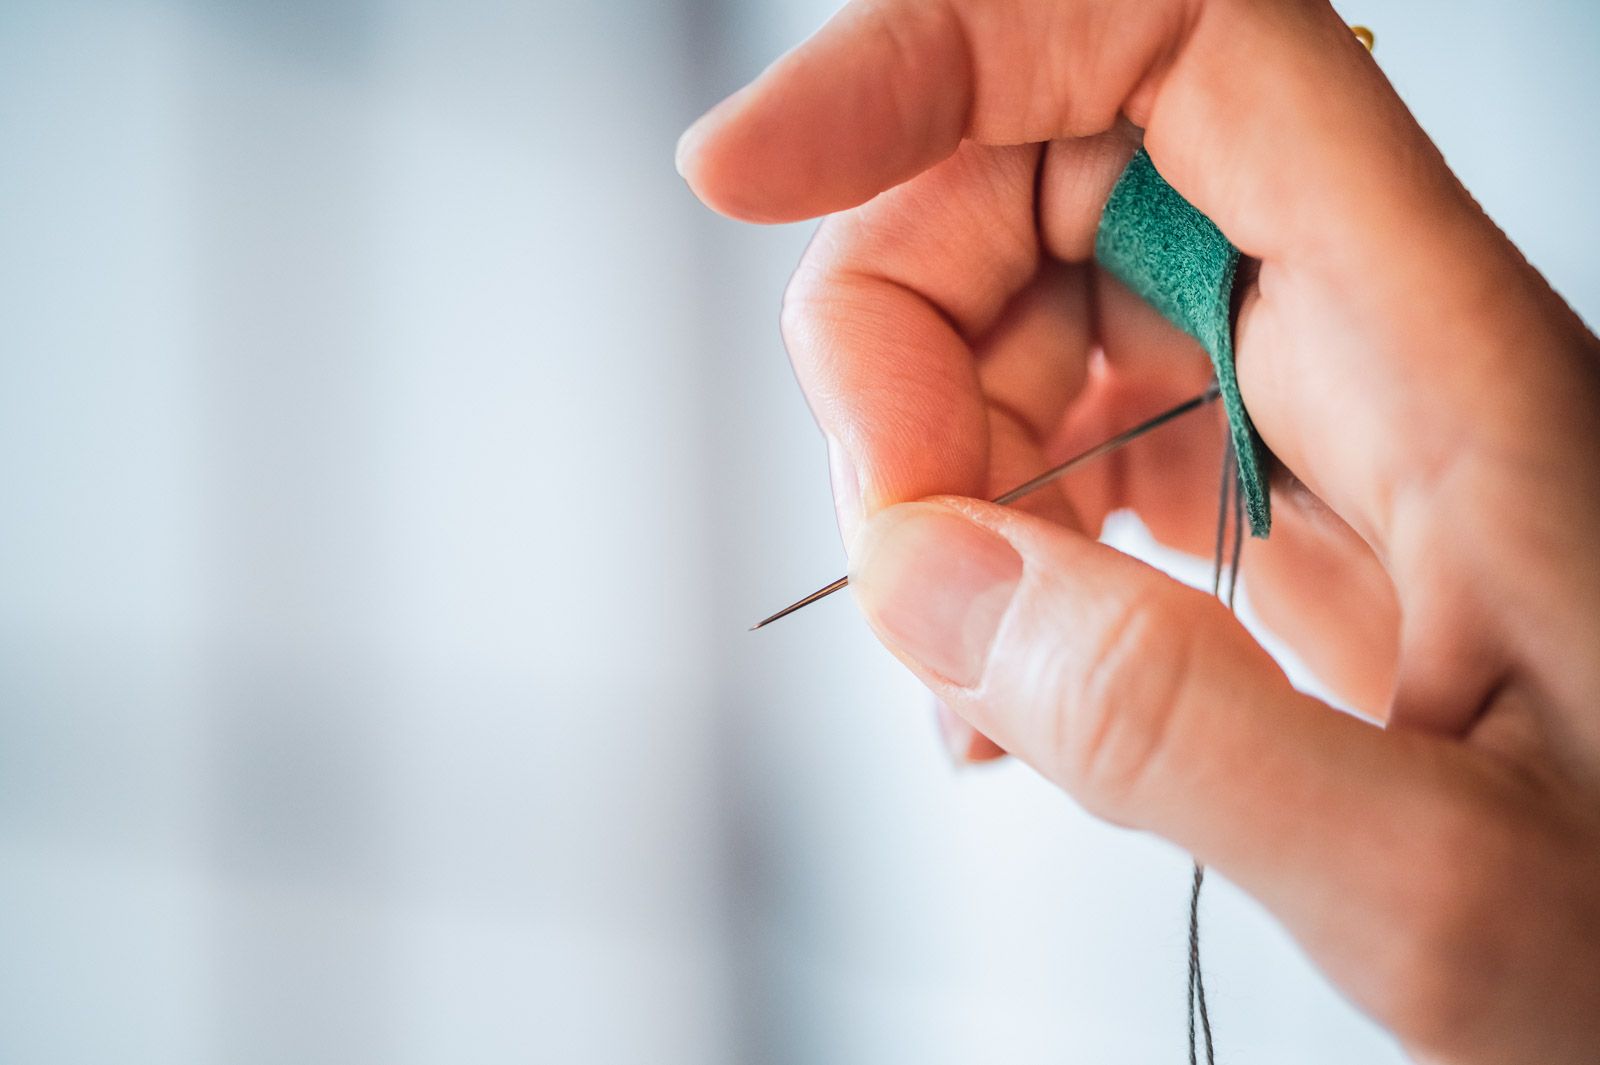
When it comes to making a quilt, the most important criterium is whether your needle can handle the quilt sandwich without breaking.
Normally I always use these sashiko needles to do sashiko. But for quilting, it is sometimes necessary to switch to a quilting needle.
Quilting needles will slow you down a little as they are shorter than sashiko needles. With shorter needles, you can't load as many stitches at once, thus the loss of speed.
Whether you can use a sashiko needle or not depends on the thickness of your quilting sandwich. Especially thick batting asks for sturdy needles.
Try out your needle of choice with caution and reduce the number of stitches you load in the beginning to find out whether your needle is up to the task.
Batting
You can choose your batting freely, but if you add a lot of sashiko stitches, even thin batting will result in a rather heavy quilt.
On top of that, thinner batting makes the stitching process easier and faster.
If you want to make an eco-friendly quilt, you can even use old sheets or other bigger fabric scraps as batting. This will also result in a quilt that is less on the quilt side and more on the traditional sashiko side.
If you don't have the perfect batting at home, this cotton batting is nice to work with:
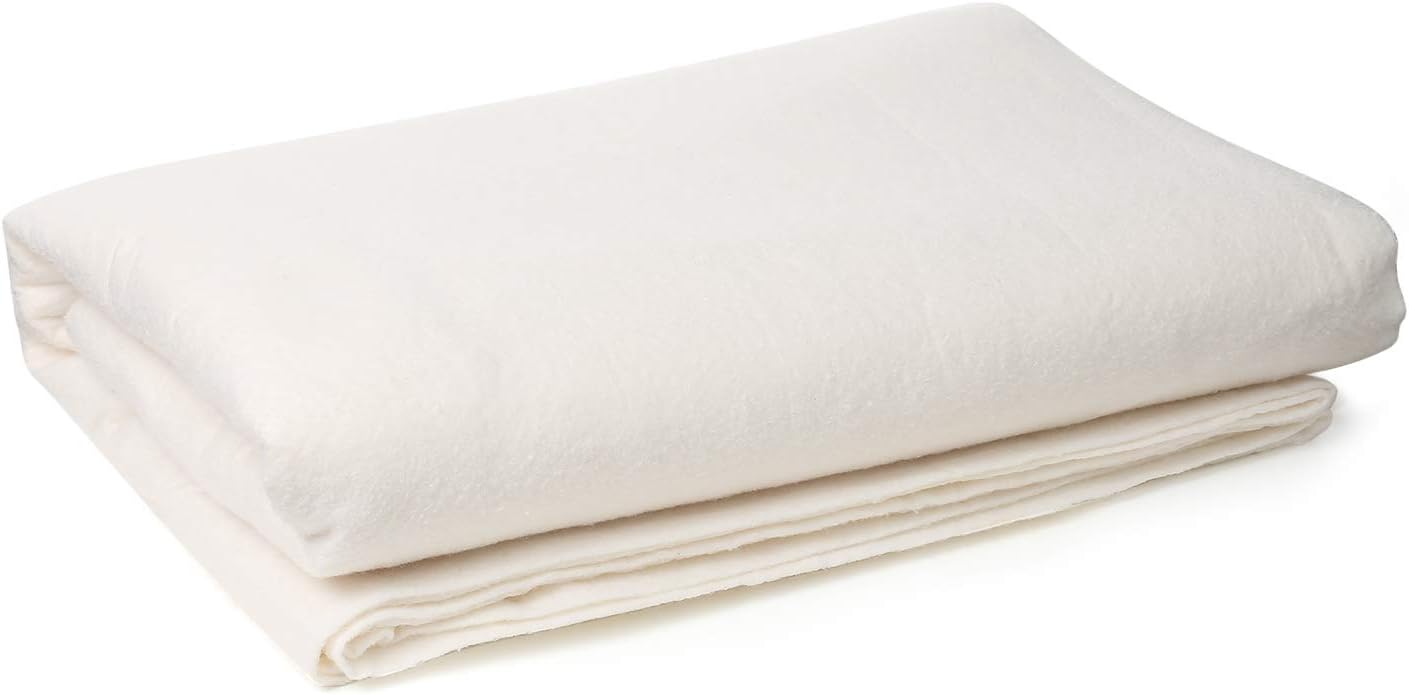
Natural Cotton Batting
Not too thick to use for sashiko, but you still shouldn't load too many stitches on.
Markers and transfer paper
I usually use markers that dissolve with heat (Sadly these are sold out most of the time. I hope you get lucky. They're awesome!). They are easy to get off with an iron when I mess up. And they don't rub off, no matter how many times I go over the same spot.
If you use dark fabric, use chalk instead, but remember that the lines may vanish if you rub against them repeatedly while stitching.
You could also use chaco paper. I've heard good things about it, but I've never used it myself:
Pins
I don't use pins, because I baste everything with needle and thread. But I've heard from a friend that quilters' pins are great to have if you prefer basting with pins. Quilters' pins have a little dent which makes them easier to pin.
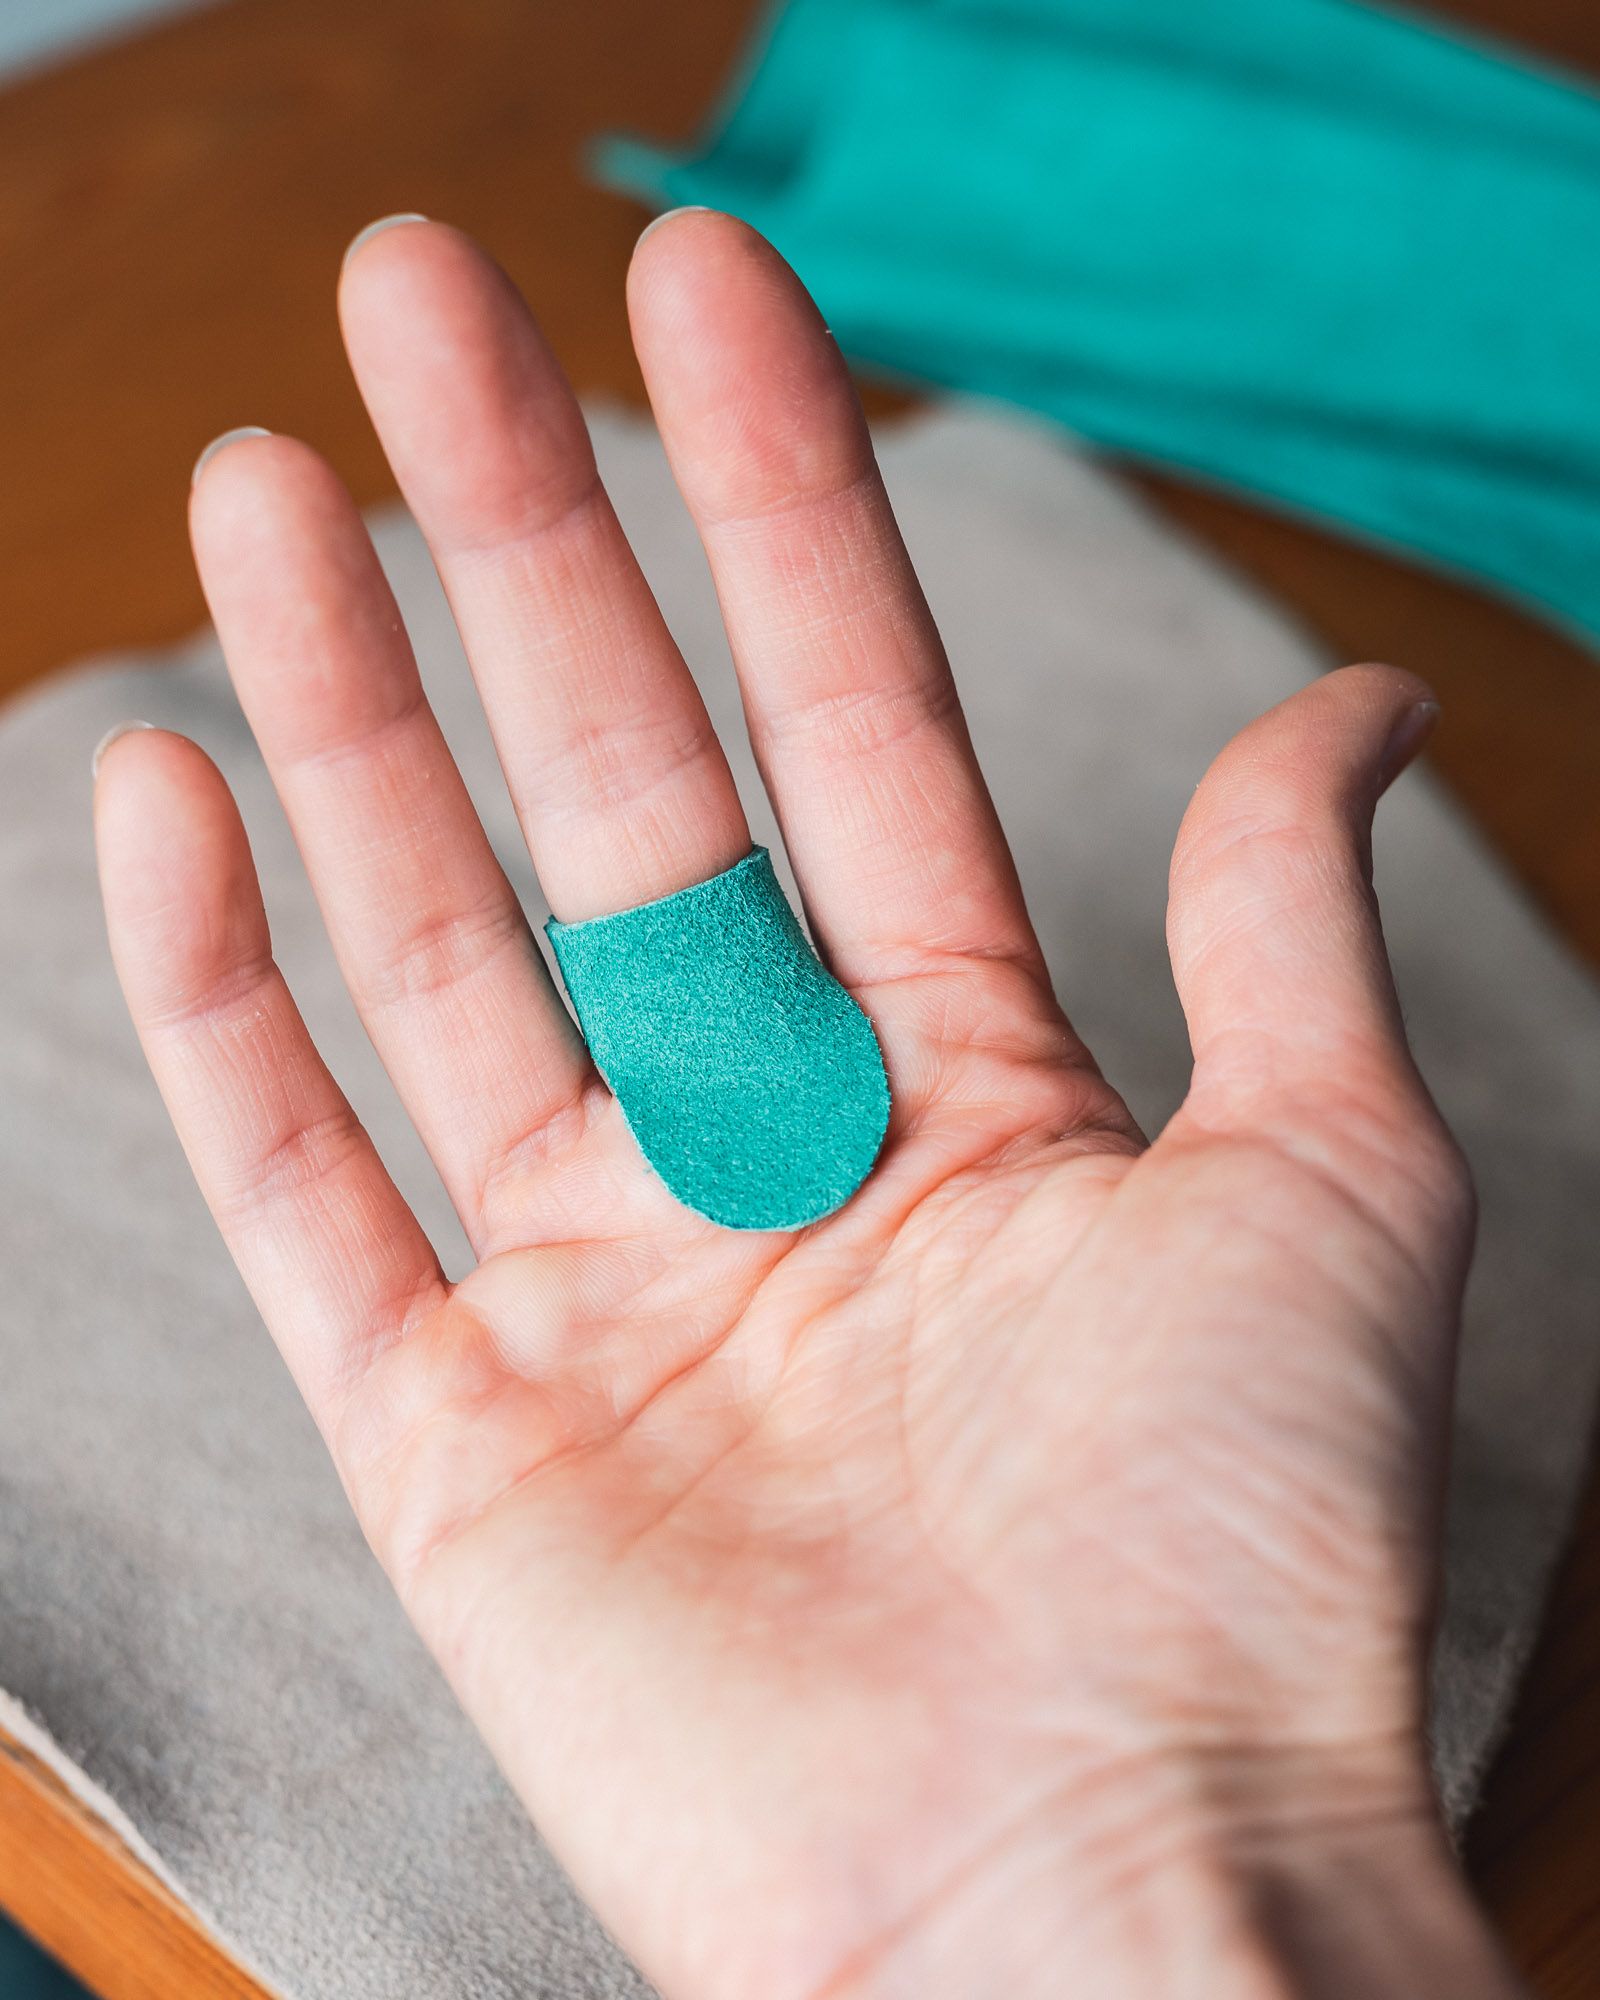
Thimbles
To use the sashiko technique and really profit from it, you need a palm thimble. You can get one from Amazon or simply make one yourself. I have always used leather thimbles and love them for their comfiness.
You can use other thimbles to push the needle through, but if you've used a palm thimble once, you'll never go back. Especially if you work on big projects.
Follow this link if you don't know how to use a palm thimble.
If you make a quilt with sashiko, please send me a photo so I can check it out and maybe share it with fellow sashiko fans.
Or you could simply tag #stitchesontherun so I can find it on social media. I'd love to share in your joy!
Comments ()